
Set up your own newsletter server on Raspberry Pi with Listmonk
Managing newsletters and mailing lists doesn’t have to rely on third‑party platforms, monthly subscriptions, or opaque limitations. With Listmonk, a powerful open‑source, free solution, you can deploy your own self‑hosted email marketing platform and retain full control over your data, configuration, and workflows.
In this guide, we’ll walk you step by step through the process of installing, configuring, and deploying Listmonk on a Raspberry Pi. The goal is to help you set up a fully functional local environment for testing, learning, and experimenting with self‑hosted newsletters and campaigns.
This tutorial is written with clarity in mind and does not assume you are a developer. By the end, you’ll have Listmonk running locally on your Raspberry Pi and accessible from your browser.
What is Listmonk and why use it?
Listmonk is a high‑performance, self‑hosted newsletter and mailing list manager. It allows you to:
- Manage subscribers and mailing lists
- Create and send newsletters and campaigns
- Handle opt‑ins, unsubscribes, and list segmentation
- Use advanced configurations to improve deliverability and subscriber experience
Because it’s open source and self‑hosted, you are not dependent on external services, or subscriptions. This makes it an excellent option for makers, developers, and teams who value transparency and control.
1. Preparing the Raspberry Pi
Start by installing Raspberry Pi OS on your device. You won’t need a graphical interface, so we strongly recommend using Raspberry Pi OS Lite to keep the system lightweight and free up resources.
Once the system is installed and you can access the device via SSH or locally, make sure everything is up to date:
sudo apt update

sudo apt upgrade -y
Installing Docker
Listmonk itself is a single binary, but it requires a PostgreSQL database. To simplify installation, dependency management, and future updates, we’ll use Docker and Docker Compose.
Docker allows us to deploy Listmonk and PostgreSQL as isolated services with persistent storage, making the setup cleaner and easier to maintain.
We already have a detailed step‑by‑step guide explaining how to install and configure Docker on Raspberry Pi. We recommend following that guide first. Once Docker is installed and running correctly, return here to continue with the Listmonk installation.
2. Installing Listmonk
First, create a directory to host Listmonk and move into it:
mkdir -p ~/listmonk
cd ~/listmonk
Next, download the official docker-compose.yml provided by the Listmonk project:
curl -LO https://github.com/knadh/listmonk/raw/master/docker-compose.yml
This file defines two services:
- PostgreSQL (the database)
- Listmonk (the application itself)
In the same directory, create a .env file. This file will store database credentials and the initial administrator account.
Edit the file using:
nano .env
Paste the following example configuration:
POSTGRES_USER=listmonk
POSTGRES_PASSWORD=changeme_postgres_password_here
POSTGRES_DB=listmonk
LISTMONK_ADMIN_USER=admin
LISTMONK_ADMIN_PASSWORD=YourStrongAdminPassword123!
Important: Replace POSTGRES_PASSWORD and LISTMONK_ADMIN_PASSWORD with strong, secure passwords before continuing.
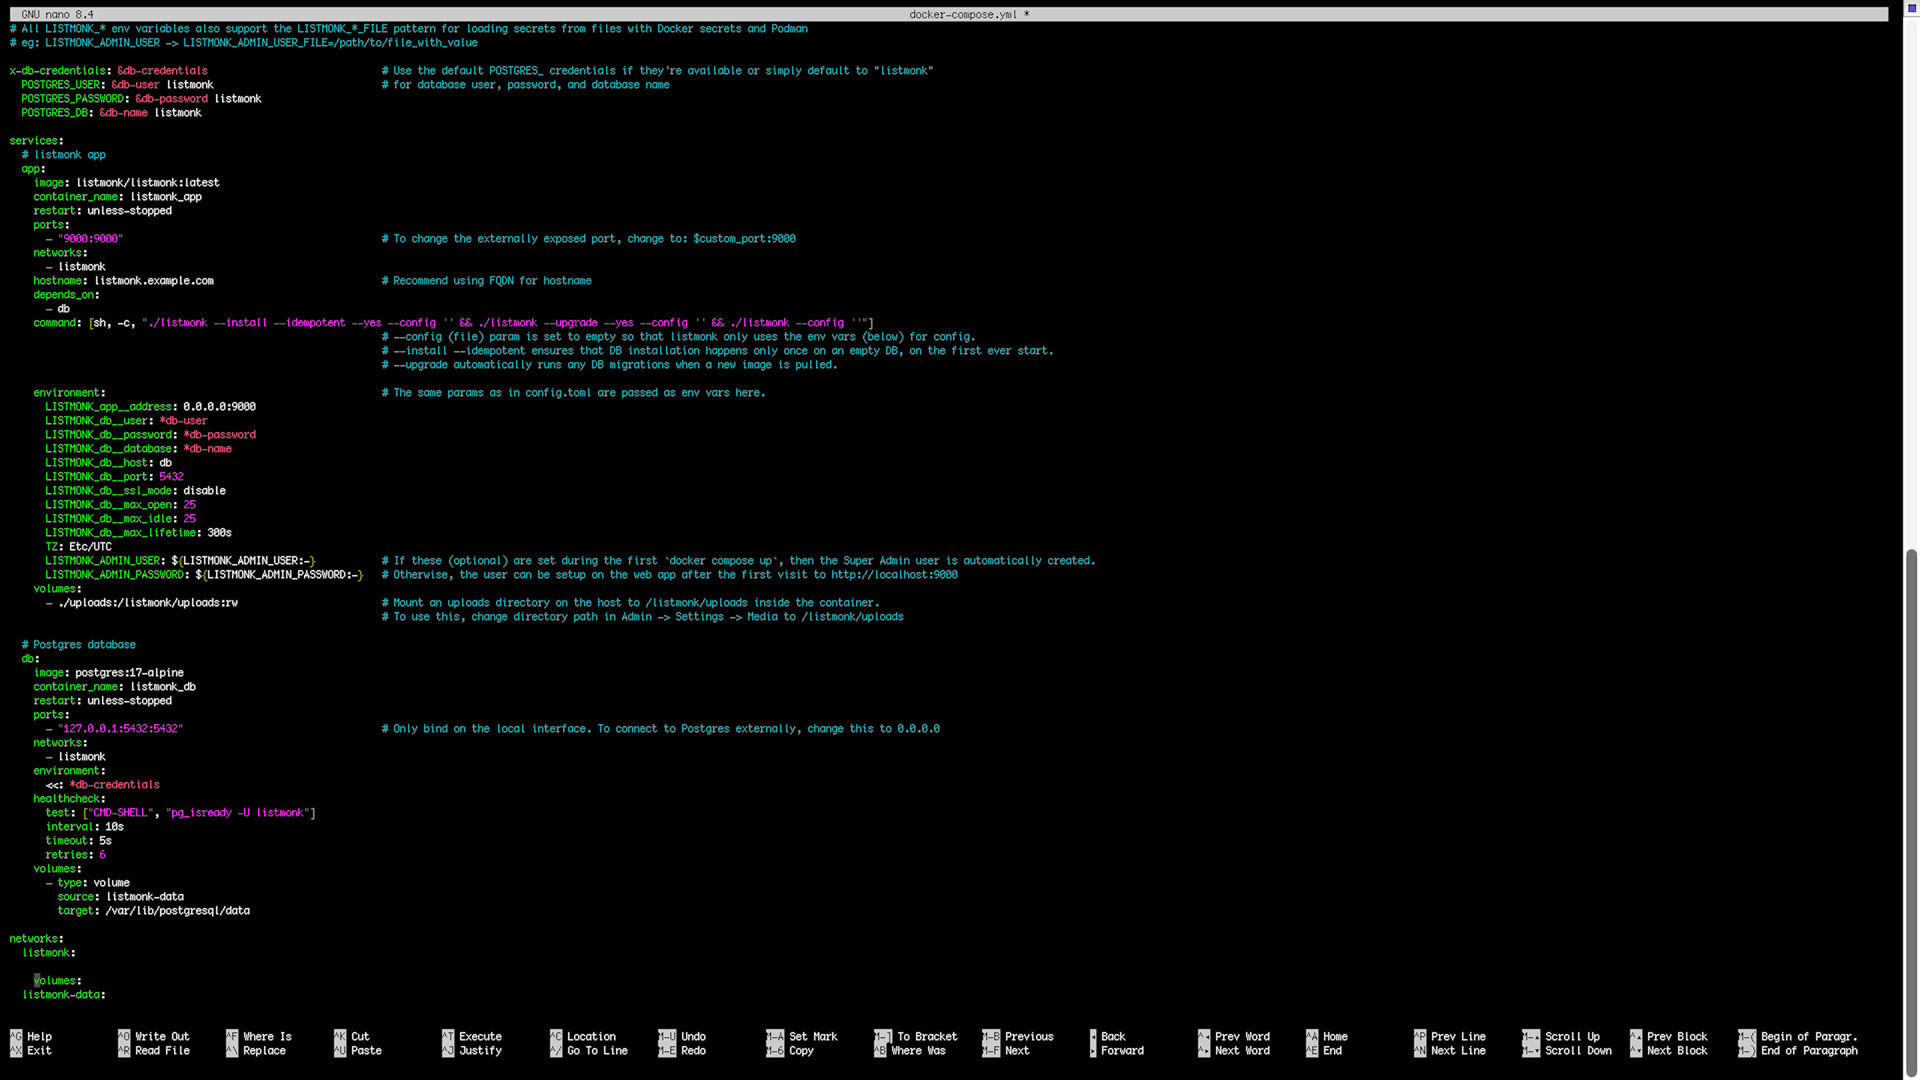
Reviewing the Docker Compose configuration (optional)
The official docker-compose.yml already defines everything needed to run Listmonk. It includes:
- A PostgreSQL service with persistent volumes
- A Listmonk service exposed on port
9000 - Automatic installation and upgrade commands on startup
Below is a minimal example for reference:
version: "3.8"

services:
db:
image: postgres:15
restart: always
environment:
POSTGRES_USER: ${POSTGRES_USER}
POSTGRES_PASSWORD: ${POSTGRES_PASSWORD}
POSTGRES_DB: ${POSTGRES_DB}
volumes:
- db_data:/var/lib/postgresql/data
healthcheck:
test: ["CMD-SHELL", "pg_isready -U ${POSTGRES_USER}"]
interval: 10s
timeout: 5s
retries: 5

app:
image: listmonk/listmonk:latest
depends_on:
db:
condition: service_healthy
ports:
- "9000:9000"
environment:
LISTMONK_db__host: db
LISTMONK_db__user: ${POSTGRES_USER}
LISTMONK_db__password: ${POSTGRES_PASSWORD}
LISTMONK_db__database: ${POSTGRES_DB}
LISTMONK_app__address: "0.0.0.0:9000"
LISTMONK_app__admin_username: ${LISTMONK_ADMIN_USER}
LISTMONK_app__admin_password: ${LISTMONK_ADMIN_PASSWORD}
volumes:
- uploads:/listmonk/uploads
command: ["sh", "-c", "./listmonk --install --idempotent --yes && ./listmonk --upgrade --yes && ./listmonk"]

volumes:
db_data:
uploads:
Notes:
postgres:15works correctly on ARM64 systems such as Raspberry Pi OS 64‑bit.- The
commandsection automatically installs and upgrades Listmonk before starting the service.
3. Starting Listmonk for the first time
From the directory containing docker-compose.yml and .env, run:
docker compose up -d
After a few seconds, open your browser and navigate to:
http://YOUR_IP:9000
You should see the Listmonk login screen or initial setup page. Log in using the administrator credentials defined in your .env file.
3. Configuring SMTP (email delivery)
By default, Listmonk does not send emails on its own. To deliver newsletters and campaigns, you must configure an external SMTP server or your own mail transfer agent (MTA).
For reliable delivery and good reputation, we recommend using a transactional email provider such as:
- Mailgun
- SendGrid
- ForwardEmail
- Postmark
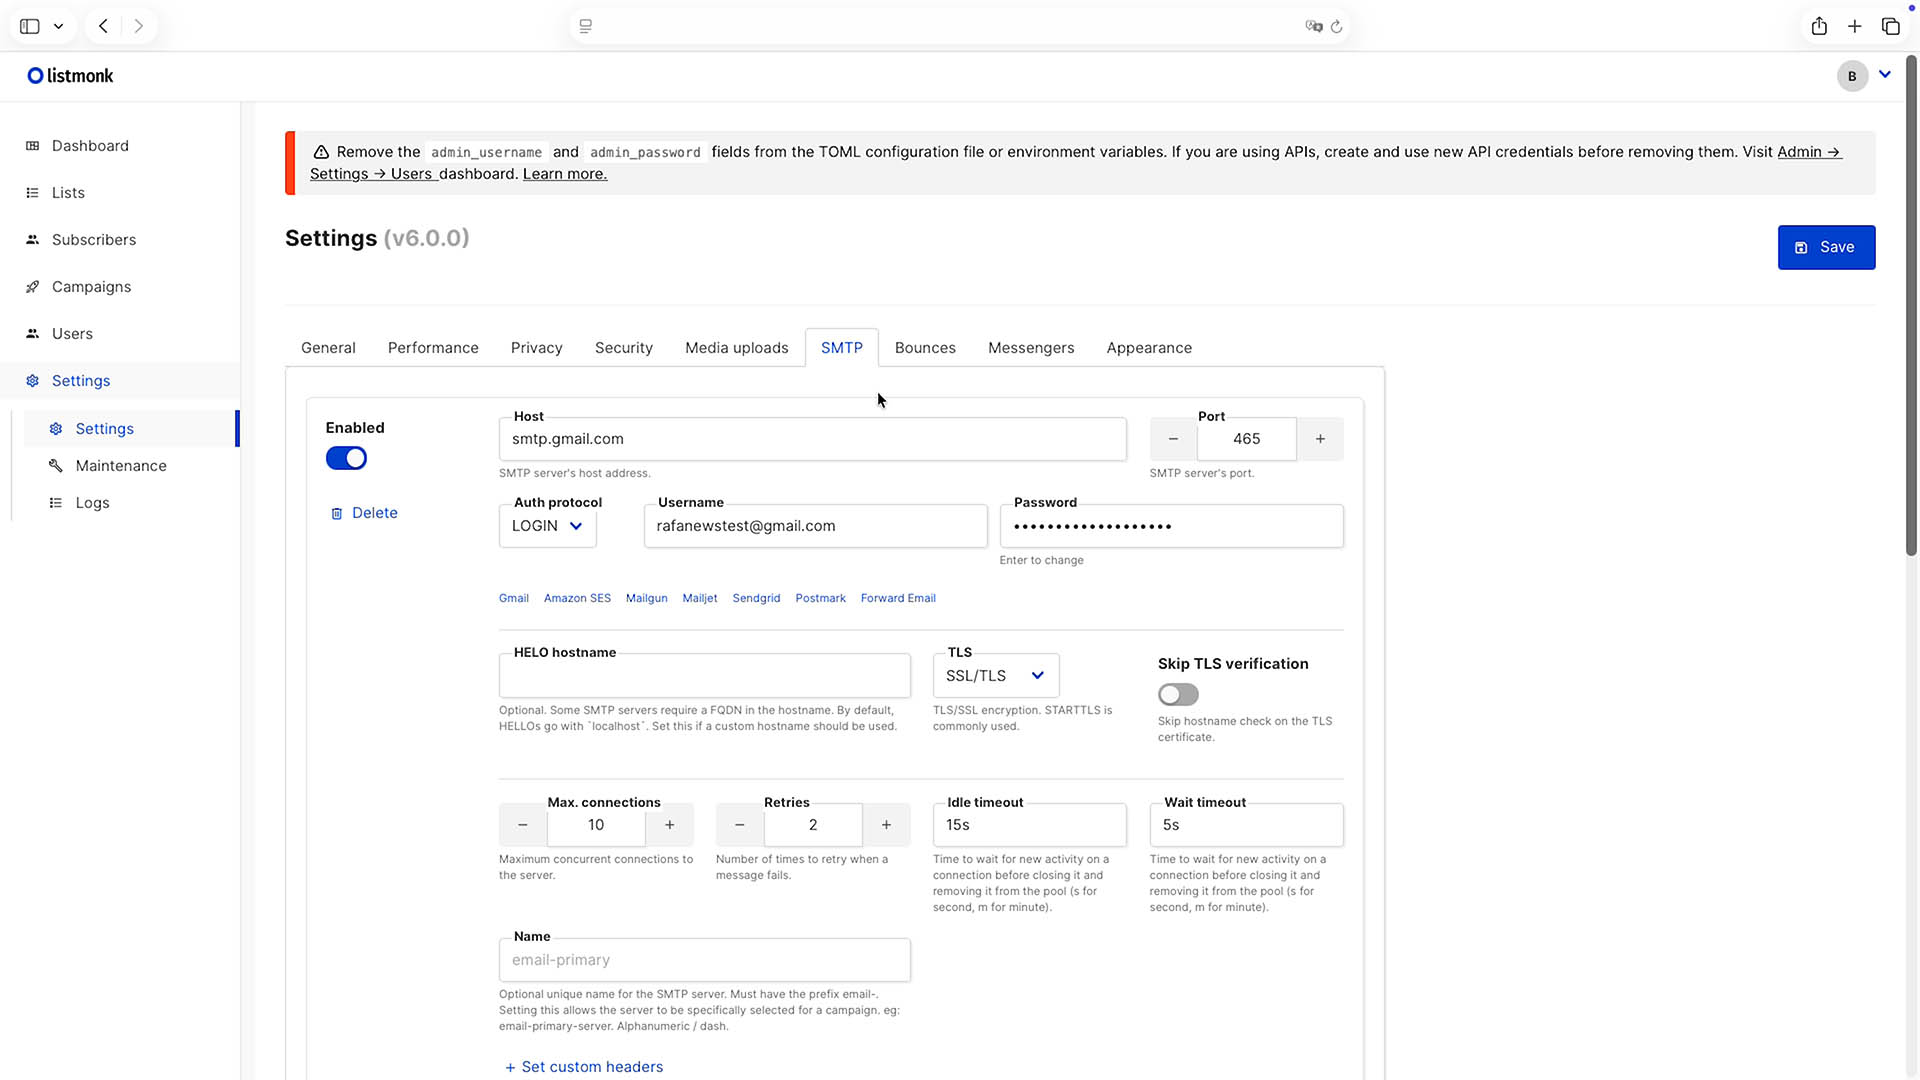
Inside the Listmonk admin interface, go to:
Settings → SMTP
There you will need to enter:
- SMTP host
- Port
- Username and password
- Encryption method (TLS / SSL)
Once configured, use the Send test option to verify that everything works correctly.
Basic SMTP setup recommendations
- Register with an SMTP provider (e.g. Mailgun or ForwardEmail)
- Create credentials and link a sending domain
- Configure SPF and DKIM DNS records to improve deliverability
- Add the credentials to Listmonk and run a test email
Removing admin credentials from environment variables (important)
After logging into the Listmonk admin panel for the first time, you may see a warning message similar to:
Remove the admin_username and admin_password fields from the TOML configuration file or environment variables.
This is not an error, but an important security recommendation from Listmonk.
During the initial installation, the administrator user is created using environment variables (LISTMONK_ADMIN_USERand LISTMONK_ADMIN_PASSWORD). Once the admin account exists in the database, these credentials should not remain hardcoded in configuration files or environment variables.
Keeping them defined can pose a security risk and may interfere with proper user and API management, especially in production environments.
How to fix the warning
Before proceeding, make sure that:
- You can successfully log in to the Listmonk admin interface
- The admin user exists under Admin → Settings → Users
Then follow these steps on your Raspberry Pi:
- Edit the
.envfile in your Listmonk directory: - Locate and remove (or comment out) the following lines:
- Edit the
LISTMONK_ADMIN_USER=admin
LISTMONK_ADMIN_PASSWORD=YourStrongAdminPassword123!- Save the file and exit the editor.
- Check your
docker-compose.ymlfile and ensure that these variables are not defined in theenvironmentsection of the Listmonk service. - Restart the services:
docker compose restart
Once restarted, refresh the admin panel. The warning should no longer appear, and your login will continue to work as expected.
Final notes and next steps
This guide covers a basic local deployment of Listmonk, ideal for testing, development, and learning how the platform works on a Raspberry Pi.
For production or public deployments, additional steps are required, including:
- Using a properly configured SMTP server for real email delivery
- Exposing Listmonk through a public URL
- Securing access with HTTPS and valid TLS certificates (for example, using a reverse proxy like Nginx or Caddy with Let’s Encrypt)
- Applying security hardening and backup strategies
Listmonk is a highly flexible platform with many advanced options, customizations, and integrations. We strongly recommend consulting the official Listmonk documentation to explore advanced configuration, performance tuning, theming, and production‑ready setups.
This tutorial is intended as a solid starting point. From here, you can gradually evolve your setup into a fully featured, self‑hosted email marketing solution tailored to your needs.
If you enjoy this type of content, take a look at the rest of our blog, subscribe to our mailing list, and check out the videos we publish on our YouTube channel.